27/10/2024
Blog technique
European Cyber Week 2024: Challenges & Write ups
Team CESTI
Find here the crypto and Javacard challenges that our teams created for the European Cyber Week pre-qualification and qualification tests of CTF.
When information and information manipulation become essential to the confrontation between states, undersea cables, satellite communications and mobile operator networks, and databases become the target of unprecedented attacks. Data mining and the cryptanalysis of sensitive encrypted files, thanks to the computational prowess of high-performance computing (quantum and HPC technologies), are the main threats to data confidentiality and integrity. The performance of machine-learning algorithms enables machines to produce complex tasks, providing malicious actors with new tools for maligning our societies, disinforming, for example, which directly undermines our democracies and wolrd global stability.
Cybersecurity experts from European countries are joining forces with the armed forces to counter these threats, which are multiplied tenfold by artificial intelligence tools. Their mission: to save Europe from a global Internet blackout that could trigger economic and security chaos on a planetary scale. A race against time is underway to ensure the continuity of essential services, the integrity of data lakes, supply chains, and the defense of citizens’ rights.
Challenges
Write Ups
Java Card – Course hipPIN
Heavily protected thanks to an OwnerPin class, so nothing bad can happen”. It gives information that the OwnerPin class does not come from the official Java Card API, but rather from a homemade class. This class aims at handling PIN codes, retry counter and so on. So, the PIN code has to be valid! The check if performed in this method:
					private void verify(APDU apdu){

byte[] buffer = apdu.getBuffer();
// retrieve the PIN data for validation.
if (pin.check(buffer, ISO7816.OFFSET_CDATA, SECRET_PIN_SIZE) == false) {
ISOException.throwIt(SW_VERIFICATION_FAILED);
}

}
The call to pin.check() must return true. The user may read some documentation about communication with a Java Card. It has to respect the APDU command format. The APDU is divided in different fields.
Tableau 1 – Structure de l’APDU de commande
Tableau 2 – Structure de l’APDU de réponse
The CLA, the INS, the INStruction parameters P1 and P2 and some data. After some research both on internet and the source code, the user might be able to determine that the values expected by the code to call verify() are:
- CLA set to 0x80,
- INS set to 0x20,
- P1 and P2 to any 1 byte value each
- Nc here is the size of the pin code of 0x06 (to guess)
- Nc bytes of data corresponding to the PIN code 0x090305050108
The user has to guess the correct length and PIN code. Because the smart card protects a building, the possible value for a PIN byte is between 0x00 and 0x09 as you can see on a regular keypad. This drastically reduces the possible number of PIN codes to try. By trying some guesses, if both the length Nc is correct and the first byte of the PIN code is valid, then a huge delay is added by the card (simulating its processing !). Then, each correct guessed byte adds extra delay until the whole PIN code is retrieved. This is a timing attack.
Once the user is authenticated by providing the correct PIN code, he has to retrieve the secret data. From the source code, we know that the total size of the FLAG is 0x0E49. The APDU has to be constructed based on this value. The call to get the data is getFlag() so the INS byte must be 0x50. Finally, the APDU buffer must be:
- CLA is unchanged to 0x80
- INS is set to 0x50
- P1 and P2 to any 1-byte value each
- Nc is 0x00
- Le, the data length expected has to be 2 bytes :0x0E49.
As a result, the card responds with the whole data buffer. Once decoded to binary, then the file is detected as a picture. It contains the Flag!
la-traque-numerique (M&NTIS dataset)
The objective of this challenge is to forensic different kind of data (pcaps, reverse, logs, machine artifacts) of a network. By reading the challenge’s description, the challenger should guess that a ransomware was deployed on a machine, and the data were ciphered. By looking at the forensic archive, we can see a suspicious file. We should decipher it. The user has to retrieve the ransomware’s binary.

He can get the ransomware’s binary by extracting it from one of the pcap files. Basically, the file is downloaded in plain HTTP on a machine before being launched. This operation is possible directly in Wireshark. Maybe the user will encounter different other binaries used by the attacker, but they won’t help to retrieve the original file.
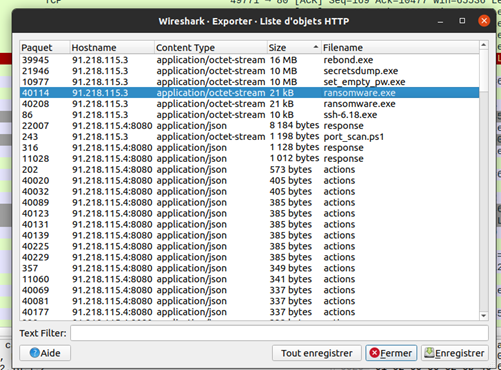
To prevent a too “easy to analyze” binary, debug information are stripped from it. IDA should be enough to understand how the binary works. The decompiling feature is available on the free version of IDA and helps a lot to understand the code. Lucky us, the attacker loves clean code, and he has separated his code in functions, the ciphering one included.
					  Stream = fopen(a1, "rb");
  if ( Stream )
  {
    fseek(Stream, 0, 2);
    v7 = ftell(Stream);
    rewind(Stream);
    Buffer = malloc(v7);
    if ( Buffer )
    {
      fread(Buffer, 1uLL, v7, Stream);
      fclose(Stream);
      v10 = 0;
      for ( i = 0; i < v7; ++i )
      {
        v4 = *(_BYTE *)(i % a3 + a2) ^ ((char)v10 % 17);
        *((_BYTE *)Buffer + i) ^= v4;
        ++v10;
      }
      sub_401560(v3, 1024LL, "%s.crypt", a1);
      v5 = fopen(v3, "wb");
      if ( v5 )
      {
        fwrite(Buffer, 1uLL, v7, v5);
        free(Buffer);
        fclose(v5);
        if ( remove(a1) )
          perror("Error deleting original file");
      }
      else
      {
        perror("Error creating new file");
        free(Buffer);
      }
    }
Some hardening were made to prevent all attacks resulting from a basic xor ciphering. The user shall now understand that the key is not embedded in the code, but it might be given by launching the ransomware from the command line.
The logs folder is a help to retrieve such arguments. Two options are now available to him. Either he can code the decipher function in another language to decipher the file later, or he can directly use again the ransomware with the correct arguments on a Windows machine. In both cases the user has to retrieve the key.
By exploring the logs folder, the user shall see some logs about the ransomware. Fortunately for the network, the “Powershell Transcript” are enabled. As a result, the plain command line triggering the ransomware including the key are logged here. The original document can easily be accessed by using the key to decipher the original documents.
{"winlog":{"provider_name":"Microsoft-Windows-PowerShell","provider_guid":"{A0C1853B-5C40-4B15-8766-3CF1C58F985A}","record_id":596,"computer_name":"dcserver.ad2016.local","event_id":"4104","process":{"thread":{"id":3468},"pid":1008},"user":{"type":"User","identifier":"S-1-5-21-1635170926-2708510339-1775900907-1164","domain":"AD2016","name":"amaillard"},"activity_id":"{696627D1-003D-0001-0331-66693D00DB01}","task":"Exécuter une commande distante","api":"wineventlog","channel":"Microsoft-Windows-PowerShell/Operational","opcode":"Lors de la création d'appels","version":1},"powershell":{"sequence":1,"file":{"script_block_id":"73166a9a-c942-4232-aa0f-d2cf9b8a7913","script_block_text":"& $env:temp\\ransomware.exe C:\\Users\\amaillard\\Downloads 32 9F5F65392882DAAC0CCC6D7C97428BBA"},"total":1},"user":{"id":"S-1-5-21-1635170926-2708510339-1775900907-1164"},"@timestamp":"2024-09-06T09:31:18.149Z","@version":"1","tags":["beats_input_codec_plain_applied"],"message":"Création du texte Scriptblock (1 sur 1) : \n& $env:temp\\ransomware.exe C:\\Users\\amaillard\\Downloads 32 9F5F65392882DAAC0CCC6D7C97428BBA\n\nID Scriptblock : 73166a9a-c942-4232-aa0f-d2cf9b8a7913\nChemin d'accès : ","log":{"level":"commenté"},"host":{"mac":["00:26:99:a9:d4:1a","00:00:00:00:00:00:00:e0"],"os":{"name":"Windows Server 2016 Standard","family":"windows","type":"windows","kernel":"10.0.14393.0 (rs1_release.160715-1616)","build":"14393.0","version":"10.0","platform":"windows"},"architecture":"x86_64","id":"1e3ddafa-6be9-40de-ba0e-35b09c3f43d1","ip":["fe80::7959:247f:aca4:796","192.168.104.2","fe80::5efe:c0a8:6802"],"name":"dcserver.ad2016.local","hostname":"dcserver"},"event":{"code":"4104","kind":"event","category":["process"],"type":["info"],"original":"Création du texte Scriptblock (1 sur 1) : \n& $env:temp\\ransomware.exe C:\\Users\\amaillard\\Downloads 32 9F5F65392882DAAC0CCC6D7C97428BBA\n\nID Scriptblock : 73166a9a-c942-4232-aa0f-d2cf9b8a7913\nChemin d'accès : ","created":"2024-09-06T09:31:19.608Z","provider":"Microsoft-Windows-PowerShell","module":"powershell","action":"Exécuter une commande distante"}}
The key is 32 bytes long and is 0x9F5F65392882DAAC0CCC6D7C97428BBA.
Authentifiction
Challenge
client.py, we retrieve a document that lists users of a malevolent association.
					User name: SugarColts
Password:
Welcome SugarColts
Get file [y/N]? y
=============================================
Classified User Directory: Operation Blackout
=============================================

List of existing users and their role.
Only our leader knows the full plan.
-------------
AbyssOverlord
-------------
    Real Identity: Unknown
    Specialization: Strategic planning, cyber warfare coordination,
        and advanced AI integration
    Recent Operations: Masterminded several high-profile cyber attacks on global
        financial institutions and government networks
    Current Assignment: Overseeing the execution of Operation Blackout, ensuring
        seamless coordination among all operatives
Protocol overview
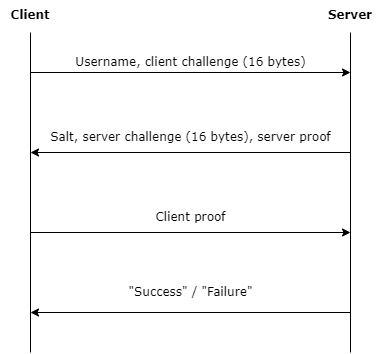
Client and server proofs are calculated using a shared secret: a symmetric key derived from the user’s password. The server does not store the password, only the secret key. Each can verify the proof of the other peer for mutual authentication.
The basic idea of the protocol is that one peer encrypts the other peer’s random challenge using this symmetric key. A correct proof is used to authenticate the user or the server.
Details
The server proof is calculated as the encryption of the following payload: client challenge (16 bytes) || username || "server".
The client proof is calculated as the encryption of the following payload: server challenge (16 bytes) || username || "client".
The encryption algorithm is AES in CTS (ciphertext stealing) mode.
Let K the secret key associated to user AbyssOverlord and E_K (block) the encryption of one block with the secret key.
Then, the payload is constituted of three blocks:
- P_1=CC (client challenge, similarly, server challenge will be named CS)
- P_2=AbyssOverlordser (the username and the first letters of “server” to fill the 16-bytes block)
- P_3=ver (the end of the word “server”)
The encryption in CTS mode can be described through the use of CBC mode:
- C_1=E_K (IV⊕P_1)
- C’_2=E_K (C_1⊕P_2 )
- C’_3=E_K (C_2^’⊕(P_3 padded with zero bytes))
Then, the penultimate block is truncated, and the last two blocks swapped:
- C_2=C_3^’
- C_3=C_2^’ truncated to the first three bytes
Steps are reversed for decryption:
- C_2 is decrypted to obtain C’_2⊕(P_3 padded with zero bytes)
- Since C_3 is three bytes long, then the last 13 bytes of the previously decrypted block are taken to complete C_3 and form the full block C_2^’
- Finally, the blocks (C_1,C_2^’,C_3^’) can be decrypted with CBC mode.
Bypass the authentication
Without knowing the password, the only possibility is to modify the server proof into a valid client proof. The script client.py indicates that the username might not be verified by the server. What remains is to forge a proof that verifies the following two points once it is decrypted:
- the first block is the client challenge
- the last 6 bytes forms the word “client”
The main modifications of the server proof to achieve are:
- Manipulation of the IV to change the client challenge into the server challenge
- Manipulation of the last blocks so that the decryption payload ends with “client” instead of “server”.
Supposing the client challenge is composed only of zero bytes, then a forged proof can be constructed as follows:
- IV_new=IV⊕CS
- C_1_new=C_1
- C_2_new=C_1
- C_3_new=(IV truncated to the first six bytes)⊕ »client »
When the server decrypts this proof (we note D_K (block) the decryption of one block):
- First block: D_K (C_1_new )⊕IV_new=CS
- Last block:
- Decryption of penultimate block: D_K (C_2_new) =IV
- Since C_3_new is 6 bytes long, the last 10 bytes of previously decrypted block (those are the last bytes of the original IV) are taken to complete C_3_new to form a full block which is: IV⊕(« client » padded with zero bytes)
- This block is XORed with the decryption of C_2_new and we get “client” padded with zero bytes
- Since C_3_new is 6 bytes long, only the first 6 bytes are taken: “client”.
This is a valid proof, since the server does not validate the username that is expected between the server challenge and the suffix “client”.
Flag
					#!/usr/bin/env python3

import socket
import json

def xor(a: bytes, b: bytes):
    return bytes([x ^ y for x, y in zip(a, b)])

try:
    s = socket.socket(socket.AF_INET, socket.SOCK_STREAM)
    s.connect(("localhost", 5000))

    # 1. Send auth_init request
    request = {
        "option": "auth_init",
        "user_name": "AbyssOverlord",
        "client_challenge": "00000000000000000000000000000000"
    }
    s.sendall(json.dumps(request).encode() + b'\n')

    # 2. Get server proof and server challenge
    data = s.recv(1024)
    response = json.loads(data.decode())
    server_proof = bytes.fromhex(response["server_proof"])
    server_challenge = bytes.fromhex(response["server_challenge"])

    # 3. Modify server proof into a client proof
    iv = server_proof[:16]
    c1 = server_proof[16:32]
    c2 = server_proof[32:48]

    new_iv = xor(iv, server_challenge)
    new_c1 = c1
    new_c2 = c1
    new_c3 = xor(iv[:6], b"client")
    client_proof = new_iv + new_c1 + new_c2 + new_c3

    # 4. Send auth_proof
    request = {
        "option": "auth_proof",
        "client_proof": client_proof.hex()
    }
    s.sendall(json.dumps(request).encode() + b'\n')

    # 5. Request file
    data = s.recv(1024)
    request = {"option": "get_file"}
    s.sendall(json.dumps(request).encode() + b'\n')

    file_content = b""
    while True:
        data = s.recv(1024)
        file_content += data
        if len(data) < 1024:
            break

    print(file_content.decode())

except Exception as e:
    print(e)

finally:
    s.close()
Qwantik
In this challenge, you have an intercepted key exchange communication. The aim is to find the shared session key. You know that the session key is exchanged using a hybrid mechanism combining RSA-1024 and Kyber-512. The combiner used is not explicitly mentioned, but the title of the challenge and the article suggests that it’s the XOR combiner. As a reminder, a key exchange takes place between two parties as follows:
- Alice generates a hybrid private – public key pair, keeps the private one sk and sends the public one pk to Bob.
- From the public key pk, Bob execution the encapsulation function and obtains a ciphertext c and a key k. He keeps the key k and sends the ciphertext c to Alice.
- Alice decapsulates the ciphertext c with her private key sk to obtain the key k herself.
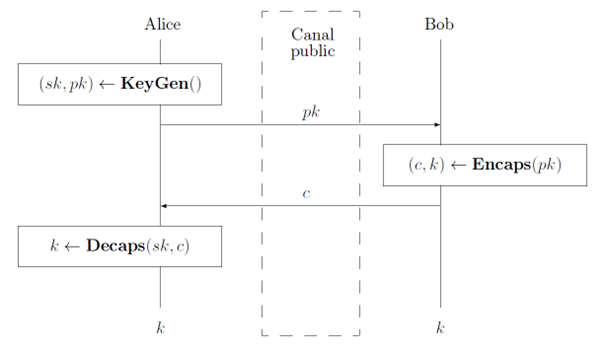
At the end of the key exchange, Alice and Bob share the same session key k. An explanation of a hybrid key exchange with the XOR combiner is available here.
In addition, you have in your possession a decapsulation oracle. This tool lets you recover the session key from a new and valid hybrid ciphertext, i.e. a ciphertext not yet sent publicly or requested to the decapsulation oracle.
Data recovery
The first step in this challenge is to recover the public data exchanged between A and B in hexadecimal with command 5. A sends B an RSA public key concatenated with a Kyber public key. B replies to A with an RSA ciphertext concatenated with a Kyber ciphertext. Here’s an example of data (outputs are black and inputs in red).
Encapsulation with public keys
With each of the two public keys obtained, we can encapsulate a new session key for RSA and for Kyber. This is made possible in the challenge by commands 1 and 2. In practice, encapsulation is something that is accessible to everyone, as the algorithms and data required are public. Click here for more details.
The result is two new ciphertexts and their corresponding keys: c_RSA, k_RSA, c_Kyber and k_Kyber.
Decapsulation requests
We can now call our decapsulation oracle with command 3. Two requests are required and for each one, a hybrid ciphertext is expected. We can request decapsulation of c_RSA ||c_Kyber, which is a different ciphertext of c_RSA ||c_Kyber. With this request, we obtain a new key that correspond to k_1≔ k_RSA XOR k_Kyber. Another decapsulation request for the new ciphertext c_RSA ||c_Kyber can be made to obtain the key k_2≔k_RSA XOR k_Kyber. Click here for more details.
Flag revelation
Now you know k_RSA, k_Kyber, k_1≔ k_RSA XOR k_Kyber and k_2≔k_RSA XOR k_Kyber and you want to know k≔k_RSA XOR k_Kyber. It’s possible!
k_RSA XOR k_Kyber XOR k_1 XOR k_2=k_RSA XOR k_Kyber=k. Click here for more details.
You can do this calculation with CyberChef (or python3 or whatever):

We can enter this session key in the challenge and get the flag! Congratulations!
